Developing using a Generator Map
The Map Directive
Using a Map directive is quite easy and very flexible, all you need to do is define a Map Directive. For example, this map directive defines a template property of type MapCollection that is named CSharpAlias. This CSharpAlias property will be populated with the mapping file values declared in the System-CSharpAlias.csmap.
<%@ Map Name="CSharpAlias" Src="System-CSharpAlias" Description="System to C# Type Map" %>
The System-CSharpAlias.csmap is resolved by looking in the current template directory as well as Generator Maps folder (Documents\CodeSmith Generator\Maps)
Map Directive Attributes
The Map directive has five possible attributes. The Name and Src attributes are required, and the other attributes are optional.
Name
The Name attribute references name of the map specified to use in code.
Src
The Src attribute defines the file name of the map file or the file path to the map file.
Description
The Description attribute supplies descriptive text to be displayed at the bottom of the property sheet when this property is selected.
Reverse
When you require to translate the lookup back to the key from the value, you can reverse the map. You simply load the collection using the reverse overloaded method.
Default
The Default attribute defines the default action to take place when a key is not found. If set to True, a default value will be returned when the key is not found.
API Usage
You can also use CodeSmith Generator Maps without using a Map Directive. This means that you are creating and populating a new MapCollection instance through code. You can interface with a map from code simply by loading the map by name.
Common API Usage
This mimics the usage of the mapping used in the example below which uses a declarative model.
MapCollection list = MapCollection.Load("System-CSharpAlias.csmap");
list.ReturnKeyWhenNotFound = true;
Response.Write(list[column.SystemType.FullName]);
Reverse Map
Call the overloaded Load method when requiring to load the map with the key value pairs swapped.
MapCollection list = MapCollection.Load(string mapName, bool reverseMap);
Debug.Assert(list[myValue]  == myKey);
See the CodeSmith Generator API help for more API Coverage.
Example
public string GetFrameworkType(DataObjectBase column)
{
   switch(column.DataType)
   {
      case DbType.AnsiString:
      case DbType.AnsiStringFixedLength:
      case DbType.String:
      case DbType.StringFixedLength:
         return "String";

      case DbType.Binary:
         return "Byte[]";

      case DbType.Boolean:
         return "Boolean";

      case DbType.Byte:
         return "Byte";

      case DbType.Currency:
      case DbType.Decimal:
      case DbType.VarNumeric:
         return "Decimal";
    }
}
Using CodeSmith Generator maps reduces the amount of code needed for lookups and also allows you to share mapping logic between templates. We can convert this code into a mapping file by creating a new map file.
Creating the map file
The first step is to open the Map Editor and create a new map file by clicking on the New File button.
Populating the map file
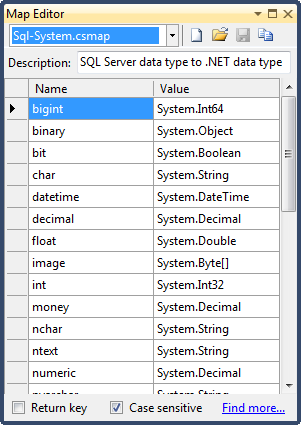
Next, we will start by filling out the name and description of our map file along with entering in the values defined above. The end result should look something like this:
Updating your template to use a map
We can start by removing the switch/Select Case statement defined above. Doing so will cause build errors (after building the template) any place where this method was being called. This allows us to use the Error Window to navigate to the usages of the previous code and update the usages to use a mapping file.
Adding a Map Directive
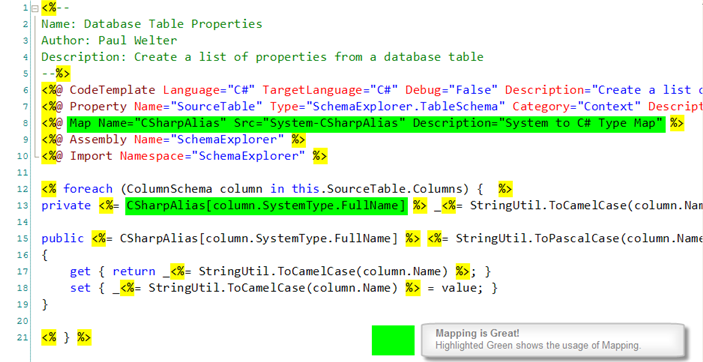
Using a map is quite easy and very flexible. You simply register the map using the Map Directive (also highlighted in green in the image below).
<%@ Map Name="CSharpAlias" Src="System-CSharpAlias" Description="System to C# Type Map" %>
Updating usages
Once the map has been registered, you simply reference the map and pass it the value similar to using another Collection class.
As you can see on Line 13 we use the mapping file by using the map name (E.G., CSharpAlias) as defined in the Map Directive on line 7. Previously the code on Line 13 would have called the GetFrameworkType(column) method.

